
Friction Circle - Part 3
In Friction Circle - Part 1 we covered some of the basics of how we represent the available grip and forces being applied to a tyre, and in Friction Circle - Part 2 we expanded the model to look at the difference forces being applied to each wheel, if you havent done so already, go and read Part 1 and Part 2 then come back here as we look at how the grip level changes for each tyres.
So we want to go faster into and through the corners, cornering speed gives exit speed and then greater speed down the next straight but we are limited by the grip. So what can we do to increase grip. Basic things like better tyres, adjusting tyre pressures and suspension settings can help, but there is more we can do as the driver to manipulate the car.
So lets consider the car with four Friction Circles representing each tyre. As we brake the weight balance distribution of the car moves towards the front, you feel this as you`re braking where the front of the car dips down. This weight transfer puts more force down into the front suspension and hence through the tyres, and gives more grip (and hence increases the size of our Friction Circle), similar to having downforce pushing the tyres into the tarmac. If we went from zero braking force to 100% braking force in an instance the front tyres would lock up, but by applying the brake progressively we can load up the front tyres, creating more grip to apply that greater braking force.
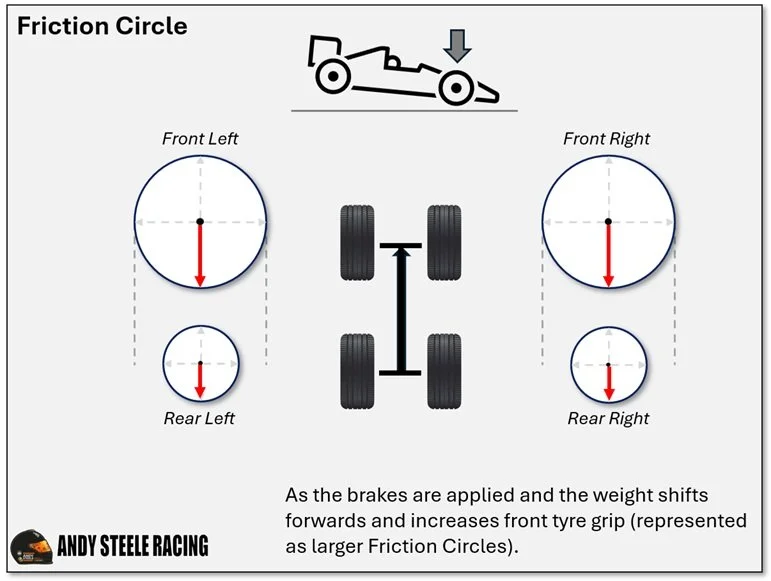
Four Friction Circles, showing the effect of braking, increasing the grip at the front, represented as larger Friction Circles.
The same happens as we turn, the weight transfers to the outside of the car, pushing the outside tyres into the tarmac, and giving more grip tose those tyres while those forces are applied.
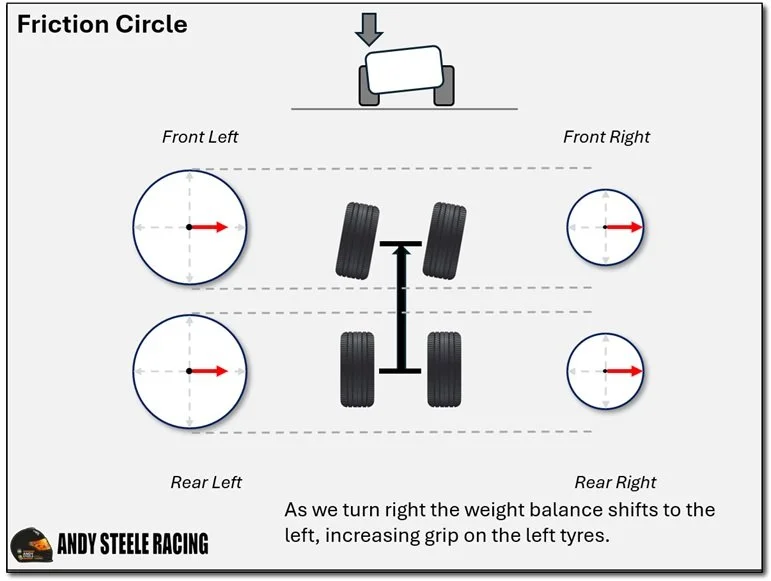
Four Friction Circles, showing the effect of turning, increasing the grip on the outside tyres, represented as larger Friction Circles.
So we need to consider the grip thats available at any point in time to each tyre, and the forces being applied, while also considering how those forces are changing the available grip.
Going into a corner we want grip on the front, for the tyres that are doing the turning, more front grip means for corning force, so we can carry more speed (faster you go the more lateral force is applied). So we can use what we have learnt here, we use the brakes to keep some of the weight distribution forwards, giving that extra grip – this is also known as trail-braking, keeping some braking force on while turning in and through to the apex. We can turn in at a faster speed, as we are using the forces to give that extra grip, while continuing a small amount of deceleration required to achieve the desired apex speed.
In the second phase of the corner, we then want the grip to the rear to keep the back end balanced, and if rear wheel drive give grip to get the power down as we exit. Here we use a similar approach, as we start to apply some power, the weight distribution shifts to the rear, giving that little extra rearward grip, we use this technique to stabilize the rear as we get to the mid corner and an on exit, rather than coasting through the corner, which might feel a safer approach, but actually gives less grip.
But if we get on the power too much, while still corning, shifting the weight balance more to the rear, reducing front end grip, we can reduce the grip level to below what is required to complete the turning for the corner. If we lift the front end too much we cause understeer, and so need to focus on progressive acceleration on corner exit to manage the grip required.
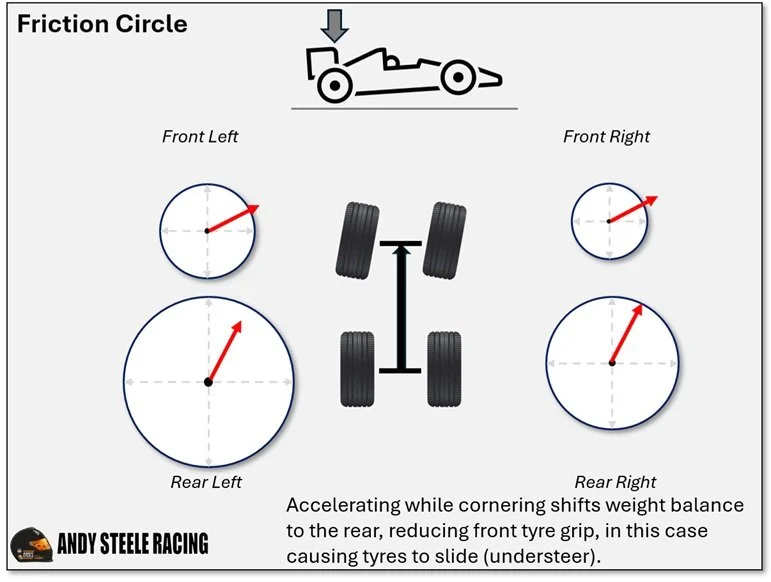
Four Friction Circles, showing the effect of accelerating while turning, increasing the grip on the rear tyres, but reducing the grip at the front, causing understeer.
Conculsion
Over the three posts covering Friction Circles we`ve covered the basics about how we use the concept to visualise both the available grip and the forces being applied to the tyres using the grip (Part 1). We`ve looked at how each tyre has its own grip level and forces, which will be differnet to the other tyres at any point in time (Part 2), and finally looked at how the forces also change the grip levels available to each tyre and we can start to use this to our advantage.
There is a lot more to consider the Friction Circles and grip levels, for example on a wet track where the grip is significantly less and more changable, we need to feel the grip from corner to corner, from lap to lap, and use our driving techniques to the fullest to manage the how we use the grip. There are also the affects of downforce, if you have such a car, where the grip increases with speed due to the affects of the airflow over the aerodynamics.
The ultimate learning should be how we can use the affects of the forces and grip levels to our advantage to optimise lap times. As driving skills progress with increased precision on the car controls, we can apply trail-braking into corners to maximise front end grip and hence turn in speed, we can use a dab on the brakes to lighten the rear end to enable more rear end rotation, we can focus on using the power to stabilise the car through apex and corner exit by shifting weight to the rear. How we apply these tips and techniques will vary from circuit to circuit and corner to corner, and the real skill is then in how and when to use each approach for the best lap times.